GridCP is our control panel to manage VPS Servers.
It allows you to perform tasks such as turning on, turning off, restarting or reinstalling your virtual server, managing IP addresses, backup copies and consulting your consumption statistics.
It is a control panel developed by us at GINERNET, this allows us to implement all the needs of our clients without depending on third parties.
If when you are using it you come up with any new functionality, let us know! we will be happy to implement it for you.
If this is the first time you access GridCP, you must request a password reset, you will receive by e-mail with a random password.
You can identify yourself with your login or with your e-mail. You receive the login by e-mail when you hire a VPS.
2 - Automatic installation of the Operating System
When you buy a VPS, it does not come installed with any operating system.
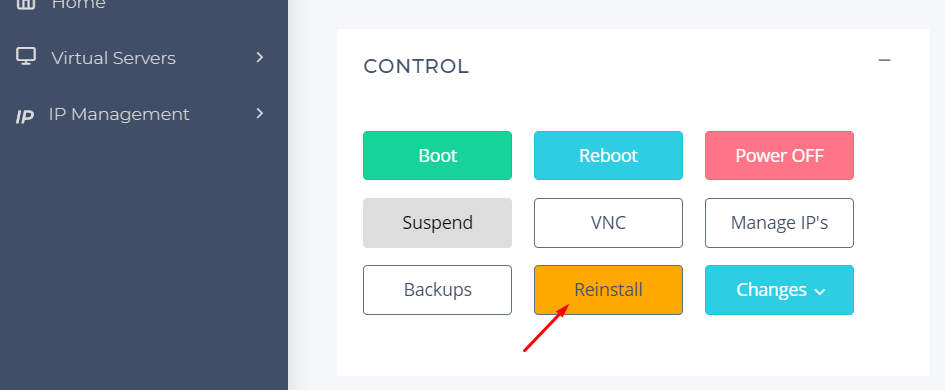
The installation of the operating system is very simple, select the VPS and click on the “Reinstall” button. Then simply choose the distribution you want to install and the process will begin. In about a minute you will receive an e-mail with the SSH access data.
If you have never connected by SSH to a server, check step 6 (below) where we explain how to do it.
3 - Manual installation of the Operating System
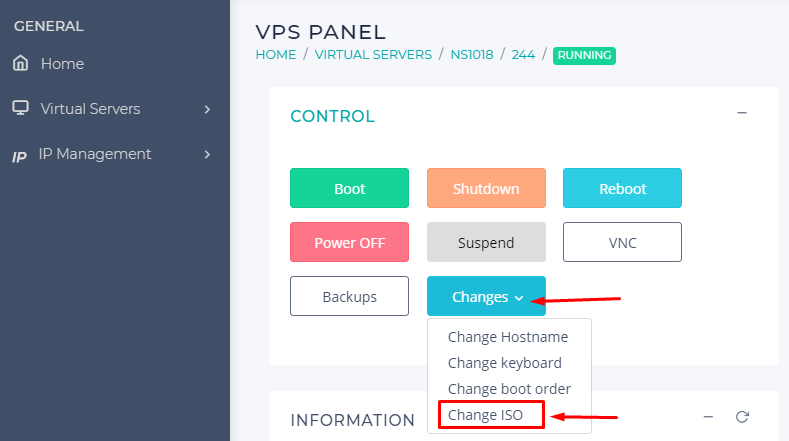
In case you want to install your own ISO, it is also possible.
Select the ISO you want to install on your VPS and click on the “Mount” button.
After you have mounted the ISO, you must turn off the VPS and turn it on again for the changes to take effect.
To access the server screen and start the installation, click on the “VNC” button.
Finally, you access the server screen and you can install your VPS the same way you would if you were on your home PC.
4 – Force a boot from CD
When you already have the Operating System installed and you want to boot a new ISO, you must restart the server and during the boot process press the ESC key on your keyboard.
Then, press the number of the option that corresponds to the CD boot.
5 - Configure the network manually
IP: You get it by clicking on the “Network settings” button in the upper left corner of the VNC window.
Mask: 255.255.255.0
Gateway: The main IP, ending in 1
DNS: 8.8.8.8, 1.1.1.1
In this video you can see how to configure the network during the installation of the CentOS 7 operating system.
5.1 - Configure the network in Windows and activate RDP access
Para configurar la red en Windows, debes acceder a la configuración de la tarjeta de red.
Right click on the network icon (next to the volume control and clock) and click on “Open Network Settings”.
Access the “Network and Sharing Center”.
Click on “Change adapter settings”.
Right click on the network card and click on “Properties
Select the Protocol v4 and click on “Properties
To configure the network, enter these parameters::
IP: You get it by clicking on the “Network settings” button in the upper left corner of the VNC window.
Netmask: 255.255.255.0
Gateway: The main IP, finished in 1
DNS: 8.8.8.8, 1.1.1.1
Finally, save the configuration and the VPS will have access to the Internet.
Once you have your Internet connection activated, you’ll probably want to access it by remote desktop.
If you have installed Windows 10, remember that remote desktop functionality is only available in Windows 10 PRO
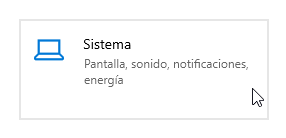
From the start menu go to Settings > Systems > Remote Desktop > Activate
The username and password for access by RDP are those you have set during the installation of Windows.
We do NOT know the password you have set when installing Windows,
therefore you must leave the session open so that when we enter by VNC we can finish the network configuration.
6 - Connect by SSH
To connect via SSH, you must use the Putty program.
When opening Putty, you must put the IP of your VPS and click on “Open”. Additionally, you can save the IP information so you don’t have to write it all the time.
The first time you connect to the VPS, it will show you information about the server’s fingerprint. Accept it by clicking Yes.
Then it will ask for your access credentials, at this point you must enter the root login and the password that you received by e-mail when installing the server.
If you have copied the password, to paste it you just have to right click on the black Putty window and press the Enter key on your keyboard. It is normal that you do not see anything written on the screen when you type the password.
If you have entered the correct data, the system will give you the step and everything will be ready for you to start launching commands to the system.
To end the session, type the command exit.
Here is a list of SSH commands:
7 - Additional IPs / Subnet
When you order a subnet / additional IPs you receive an empty “bag” where you can choose the IPs you want to add.
Each of these IPs can be individually routed to different VPS. For example, a subnet IP can be on a VPS today and you can move it to another VPS tomorrow.
To choose the subnet you must access GridCP > IP Management > Subnets > Choose Subnet
7.1 - Configure additional IP addresses in CentOS 7
Edit the file:
nano /etc/rc.d/rc.local
And add this line:
sh /etc/sysconfig/network-scripts/add-ip.sh;
Grant execute permission with this command:
chmod +x /etc/rc.d/rc.local;
Edit the file:
nano /etc/sysconfig/network-scripts/add-ip.sh
and add the commands to configure each of the additional IPs:
ip a add 192.168.1.11/24 dev eth0
ip a add 192.168.1.12/24 dev eth0
ip a add 192.168.1.13/24 dev eth0
192.168.1.xx / 24 being the additional IPs you want to add and eth0 the network interface of your server.
The new IPs will be activated after restarting the server, since it will execute the script defined in /etc/rc.d/rc.local.
To activate IPs without rebooting, you can run this command by hand:
sh /etc/sysconfig/network-scripts/add-ip.sh
7.2 - Configure additional IP addresses in Debian 10
Edit the file:
nano /etc/network/add-ip.sh
and add the commands to configure each of the additional IPs:
ip a add 192.168.1.11/24 dev ens18
ip a add 192.168.1.12/24 dev ens18
ip a add 192.168.1.13/24 dev ens18
192.168.1.xx / 24 being the additional IPs that you want to add and ens18 the network interface of your server.
Grant execute permission with this command:
chmod +x /etc/network/add-ip.sh
Run the cron task wizard.
crontab -e
and add at the end this line:
@reboot /etc/network/add-ip.sh
The new IPs will be activated after restarting the server, since it will execute the script defined in the cron.
To activate IPs without rebooting, you can run this command by hand:
sh /etc/network/add-ip.sh
8 - Define or change the reverse RDNS / PTR of an IP
All VPS hosted in GINERNET have the option of defining the PTR record or reverse associated with the IP assigned to the VPS.
The reverse PTR statement is compatible with both IPv4 and IPv6.
To set up the reverse:
Access GridCP and enter the IP Manager in the menu on the left.
For each of the IPs you have, you can define the inverse.
What inverse should I put? If it is the main IP, it defines the hostname of the server as inverse, if it is an additional IP, any of the domains hosted on said IP.
IMPORTANT For do not get an error, it must respond to ping, that is, you cannot define the google.com domain as inverse because this domain does not respond to ping the IP of your VPS.
9 - Change the root password
This intervention can be carried out by GINERNET support for a cost of 25 € You can request it at support@ginernet.com, alternatively you can do it yourself by following these steps:
If you have lost the root password on a KVM server, you must follow these steps to reset it:
Keep in mind that these commands are not “universal” and may vary depending on the configuration of each server.
Mount the ISO “Rescue-CD” and boot the server from the CD (You have it explained above in steps 3 and 4)
From the rescue command window, identify the system partition with the command
fdisk -l
Mount the system partition, for example:
mount /dev/sda1 /mnt/
Run the chroot command on the mounted partition:
chroot /mnt /bin/bash
Change the root password with the following command:
passwd root
Once the password is changed, restart the server and you should be able to log in with the new password.